Dec 17, 2020 By Team YoungWonks *
Raspberry Pi is a series of small single-board computers developed in the UK by the Raspberry Pi Foundation with the aim of promoting teaching of basic computer science in schools and in developing countries. Today, Raspberry Pi is commonly used in robotics. In this blog, we shall take a look at the pin configuration of a Raspberry Pi 4 board. 
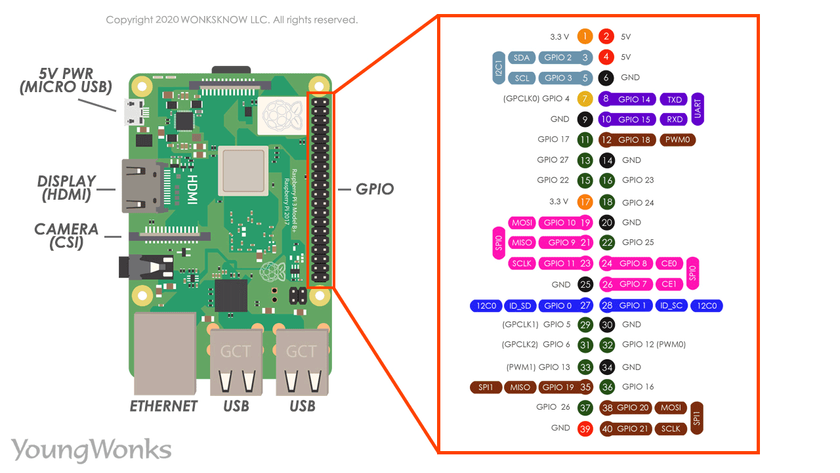
A Raspberry Pi 4 board has 40 pins on it. Among these pins, we have four power pins on the Raspberry Pi, two of which are 5v pins and another two are 3.3v pins. The 5v power pins are connected directly to the Raspberry Pi's power input and we can use these pins to run low power applications.
Then there are the ground pins. There are eight ground pins and all of these are connected to each other; you can use any of these ground pins for your projects.
That leaves us with 28 GPIO pins, labeled starting from GPIO 0 and going up to GPIO 27.
The GPIO pins, as indicated by their full form, can be programmed to be output pins or input pins. So we can set values of output pins and we can even read values of input pins. The GPIO pins can be digitally programmed so that they can be turned ON or OFF. The output of any GPIO pin is 3.3v and can be used to control output components like an LED or a motor. These ON/OFF conditions can also be interpreted as a Boolean True/False, 1/0 or HIGH/LOW.
These are the common types of pins on a Raspberry Pi 4 board. Some of these pins also have a dual function. For example, pin 3 or GPIO 2 also acts like an I2C pin.
Attend Raspberry Pi GPIO classes
To learn more about the Raspberry Pi GPIO, you may attend the YoungWonks Coding Classes for Kids or the ProWonks Coding Classes for Adults. In these programs, students learn to code and build projects using Python and Raspberry Pi. Students use Raspberry Pi GPIO to build IoT and robotics projects. Students can try these classes for free by scheduling the free trial class.
*Contributors: Image by Abhishek Aggarwal

