May 09, 2019 By Team YoungWonks *
To be able to code on a Chromebook, we need to install Linux on a Chromebook. Chromebooks can now install Linux in a virtual container within the Chrome OS, without the need to reinstall the complete operating system on the device.
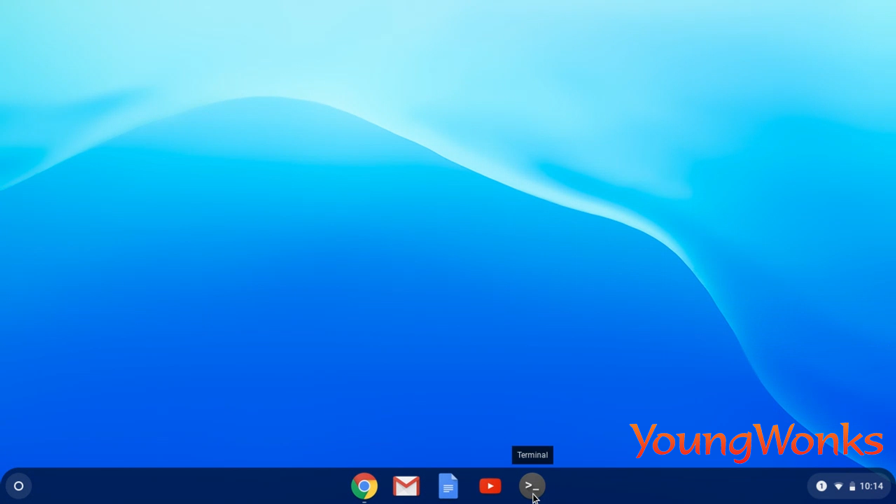
To install Linux, you need to click on the time option at the bottom right corner of your screen.

Once you do that, you will see a pop-up window that will open. Look for the Gear icon and click on it.

That will open Settings for your Chromebook. Open the menu under Settings.

Look at the options showing in the menu and you’ll see the one that says About Chrome OS.

Now you can check if your Chrome OS is in fact the latest version available. If it is not the latest version, you have to update the OS by clicking on the box that says Check for Updates.

Here the Chrome OS is the latest version as shown.

In case, the Chrome OS is not the latest one, it will ask us to upgrade it.
Now when you go back to the Settings menu, you can find an option saying Linux (Beta).

This will allow us to install a Linux container within the Chrome OS. Typically, the latest version of Chrome OS has the Linux (Beta) option; but in some instances it may not be available. This is because there are only some Chromebooks that support the Google project called Crostini.
To find out if your device is supported by Crostini, open the following link on your Chrome browser: https://chromium.googlesource.com/chromiumos/docs/+/master/containers_and_vms.md#Crostini
You’ll then need to see if your computer uses one of the boards shown on the screen.

To do this, you can go to the device list as shown.

Then you can look for the board being used by your device in the column as shown.

Now that you have seen the Linux (Beta) option under the Settings menu, you can start installing Linux by clicking on this option as shown.

Then turn on Linux by clicking on the box as shown.

Then click on the Install button.

Now installing Linux might take some time as shown.

Now once the Linux installation is complete, it automatically opens the Linux terminal.

At this point, we shall close the Terminal in order to see how one can open it ourselves on the Chromebook.

To do this, you can start by clicking on the Launcher as shown.

Now look for the Terminal in the search window by typing terminal. You can now open it by clicking on the Terminal icon.

You can also add it to your shelf by right clicking on it and selecting the pin to shelf option as shown.

Now the Terminal will be easily accessible on your Chromebook as it is has been pinned to your shelf.
So once you click on Terminal in your shelf, you will be able to open it.
Now that you have installed Linux on your computer, you can install Linux programs using Linux commands.
You can primarily use an Apt-Get-Package manager to install Linux programs.
You can start by upgrading the Apt-Get-Package manager to the latest version. You do that by typing the following in your Linux terminal: sudo apt-get update

When you hit enter, it update all the packages as shown.

Now you can use the Apt-Get-Package Manager to install, say a Python program. So you begin by installing IDLE3 which allow you to run Python programs. IDLE is basically an integrated development and learning environment for Python.
To install IDLE, you need to type the following in the terminal: sudo apt-get install idle3

At this point, you will be asked if it’s okay for the installation to take up some disk space on your computer. To this you reply with a y as shown, indicating a yes.

Now you need to wait for IDLE3 to get installed.
Once it has been installed, you can shut the terminal as shown.

Now you can add the IDLE3 terminal to your shelf like earlier. This means you go to the launcher and type IDLE3 in the search window. You will then see the IDLE3 (using Python-3.5) terminal icon.

You can right click on it and select the pin to shelf option. This means from now on, clicking on the IDLE3 icon on the shelf will open the Terminal.

To check if the Python shell works, you can type the following: 2+2 and it will show the result as 4.

Now if you wish to take it one step further and not only write Python programs but also build games using Python, then you can install PyGame on your Chromebook.
To install PyGame, you need to use a package manager called pip. So you first install pip on your Chromebook using apt-get, then you install PyGame using pip.
So the command to install pip is as follows: sudo apt install python3-pip

After hitting enter, again you will be asked if you wish to continue given that the installation shall take up additional disk space. You can type y in response like earlier.
Just like apt-get allows you to install Linux programs on the computer, pip is a package management tool that will allow you to install Python programs. Bear in mind that installation of pip might take some time.
Now pip has been installed.

This means you can use pip package manager to install PyGame. To do this, you can write the following command in the terminal: sudo pip3 install pygame

Now PyGame has been installed as shown.

To check if PyGame has been successfully set up in your Python IDE, you can open your Python shell and type the following: import pygame
If you do not see any errors, then that means PyGame has been installed as shown.

This brings us to an end to the blog on setting up your Chromebook so as to write Python programs and build games.
You can also use Chromebook to learn the programming language, Scratch. Scratch is a great way to learn the foundational concepts in computer science - be it sequencing, branching, looping or variables. To work with Scratch on your Chromebook, you need to open your Chrome browser and go to the URL

If you already have an account, you can log in directly and if you don’t, you can click on Join Scratch button and create an account. Also, should you choose to not make an account, you can still use Scratch by clicking on the Start Creating button.

Now you can use Scratch on your Chromebook. It is helpful for students to learn Scratch as it helps with critical thinking.

Elevate Your Coding Skills with YoungWonks: From Python to Game Development
Are you a budding coder using a Chromebook? Unlock the full potential of your device with Python and Pygame! However, if you're looking to take your coding journey to the next level, YoungWonks offers a range of enriching opportunities for young learners. Explore our comprehensive Coding Classes for Kids and delve into the world of programming with expert guidance. For those interested in Python, we have specialized Python Coding Classes for Kids designed to nurture proficiency in this versatile language. Additionally, if you're intrigued by the exciting realms of Raspberry Pi, Arduino, and Game Development, our dedicated classes offer hands-on experience and expert guidance. Discover our Raspberry Pi, Arduino, and Game Development Coding Classes and embark on a journey of limitless creativity and innovation. Elevate your coding skills with YoungWonks today!
*Contributors: Written by Vidya Prabhu; Lead image by: Leonel Cruz