Apr 29, 2021 By Team YoungWonks *
What is Arduino Uno Rev3 and where is it used? How is it used? If you are a young maker just starting out, you may have tried to figure this out. This blog here is your answer. In this blog, we shall cover what Arduino Uno Rev3 is, where it is used and how one can unbox it, set it up and write the first program.
What is Arduino Uno Rev 3?
Arduino Uno Rev3 is an open-source microcontroller board based on the Microchip ATmega328P microcontroller and developed by the tech company Arduino. The board is fitted with sets of digital and analog input/output (I/O) pins that can be interfaced to several expansion boards (shields) and other circuits. It has 14 digital input/output pins out of which 6 can be used as PWM outputs, 6 analog inputs, a 16 MHz quartz crystal, a USB connection, a power jack, an ICSP header and a reset button. Since it has everything needed for supporting the microcontroller, one can just connect it to a computer with a USB cable or power it with a AC-to-DC adapter or battery to get started.
Like all leading IoT boards today, it has several advantages. For starters, Arduino Uno Rev3 is easy to learn. Plus, it has low costs, a wide array of sensors and many third-party libraries. There’s also a large number of (online and free) resources that can be used with this IoT board; it enjoys great community support. However, it must be noted here that compared to Raspberry Pi, Arduino Uno Rev3 can require more effort to perform tasks like scheduling and database storage.
Arduino Uno Rev3 projects
Arduino Uno Rev3 is perfect for projects such as programming a temperature and humidity sensor, detecting motion with AC/ static electricity, controlling an automated soldering robotic arm, making a musical instrument, a fingerprint door lock, robotic cars and so on.
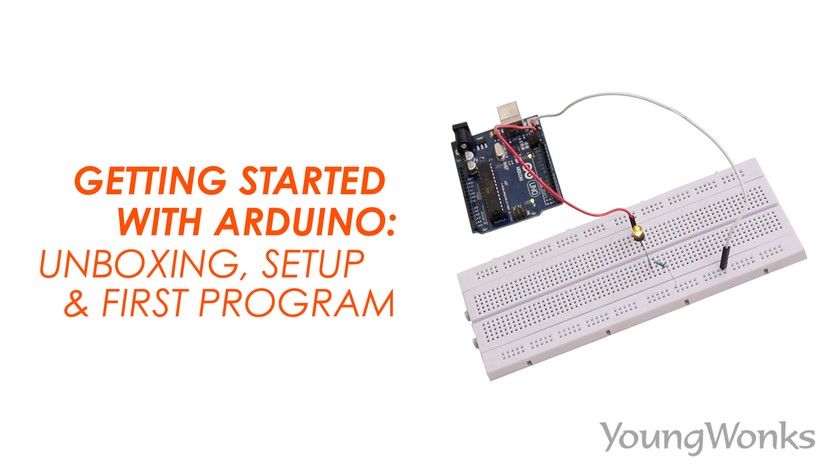
Getting Started with Arduino Uno Rev3: Unboxing, Setup and Writing the First Program
The Arduino Uno Rev3 is a microcontroller devboard; it has the EVR microcontroller on it. 
Now to get started with the Arduino Uno Rev3, we also need a breadboard, a resistor, an LED and a couple of wires. 
Now we can go to the Arduino website (https://www.arduino.cc/) and download the IDE or the editor in which we shall write our code by going to the Software section on the home page. 
The software as you can see is available for all platforms, Windows, Linux and Mac. 
Here we shall choose the software for Windows but the process is the same for other operating systems too. 
Now follow the defaults on the installation. Some may get some prompts or be asked permissions to install certain USB drivers, just accept them. 
Once you have the software installed, just launch it by searching for Arduino. 
Now this is where we will be writing our code. You will see that there are two blocks, one is void setup and there is the void loop. 
The first program we will write is just printing Hello repeatedly and the void setup allows us to do any one-time configuration. 
The void loop is the code that runs over and over and here we will print a single line saying Hello. 
Now before we can run this, we have to save it. 
We also double check to make sure that the Arduino detected by the software and the board is also the right one. 
We are then going to upload the code onto the Arduino Uno Rev3. 
Now once it gets successfully uploaded, we will be able to see the result on the serial monitor. Here you can see Hello being constantly printed. 
The next thing we will be doing is to write a program to blink an LED, the onboard LED on the Arduino Uno Rev3. Now this is located at pin number 13 and you can also check the Arduino pinout diagram. We start off by configuring pin number 13 as an output in the void setup. 

Then in the void loop, you turn it on and wait for a second. Then we turn it off and wait for a second again, for us to be able to see it blink. 
Now it will load the program onto the Arduino. 
Next you should be able to see the onboard LED of the Arduino Uno Rev3 blink. 
We are now going to extend this by building an LED blink circuit and try to use the same program to be able to blink the external LED. So we don’t need to make a change in our program, we only need to build a circuit and hook it up to pin number 13. 
Next we connect an LED and a resistor on the breadboard; next we connect the positive end of the LED to pin number 13 of the Arduino Uno Rev3 and we connect the negative to the negative side of the LED connected through a resistor breadboard. 
Now you can see the LED blink without any changes in the program.
Watch the video below to see how one can get started with the Arduino Uno Rev3:
Getting Started with Arduino Uno Rev3: A Gateway to Exciting Projects
If you're intrigued by the possibilities that Arduino Uno Rev3 opens for young learners and hobbyists alike, consider taking the first step towards mastery with our specialized coding programs. At YoungWonks, we offer comprehensive Coding Classes for Kids designed to introduce and sharpen programming skills in a fun and engaging manner. For those looking to focus specifically on Python, our Python Coding Classes for Kids cover everything from the basics to more advanced concepts. Additionally, our Raspberry Pi, Arduino and Game Development Coding Classes are perfectly curated to guide students through their Arduino Uno Rev3 learning journey, ensuring they gain hands-on experience in building and programming their own projects. Start your coding adventure with us and unlock the door to countless creative and educational opportunities.
*Contributors: Written by Vidya Prabhu; Lead image by: Leonel Cruz