
Jul 14, 2022 By Team YoungWonks *
What is Image Processing?
Images contain a lot of necessary information which can be useful in many ways. Image processing is a technique used to get such information from images. Image Processing is a preliminary step to pre-process an image in order to get the data required to build machine learning and artificial intelligence algorithms. It is a core part of computer vision which helps us transform and manipulate images and extract information from them. This information is stored in the form of data.
Python is one of the widely used programming languages for this purpose since it has many libraries which can directly be used to pre-process images efficiently. Using Python programming we can use a few computer vision libraries for this task for example Pillow, OpenCV, SimpleCV and Scipy. We are going to look into OpenCV library for image pre-processing in this blog.
What is OpenCV?
OpenCV stands for Open Source Computer Vision. It is a popular tool used for image processing tasks in different applications. This open-source library is used to process images and videos for face detection, object detection, as well as human handwriting. OpenCV is supported by many programming languages such as Python, C++ and Java. We will be using Python in this tutorial to demonstrate the use of OpenCV library for image processing. To understand more about the what is OpenCV, where it is used and its advantages, refer to our blog on What is OpenCV using the link given below:
https://www.youngwonks.com/blog/What-is-OpenCV
In this tutorial we will look into the basics of pre-processing images by loading images and video, retrieving its data and transforming them. Finally, we will look into displaying these transformed images on various devices.
Basic Requirements
Make sure to have a Python IDE pre-installed. Refer to our blog on "pydataset - a Python dataset library" https://www.youngwonks.com/blog/pydataset-a-python-dataset-library to find the steps to install the latest Python 3 version in case you don’t have it installed. We will also need the numpy library to be installed.
You will also have to know the basics of Python programming language.
Install OpenCV Library
OpenCV is compatible in Windows, Linux and Mac. When an image is read using OpenCV, it is represented using an numpy array.
Syntax: pip install opencv-python
pip install numpy
Capture and read images/videos from different sources
1. Read and show an image:
Syntax:
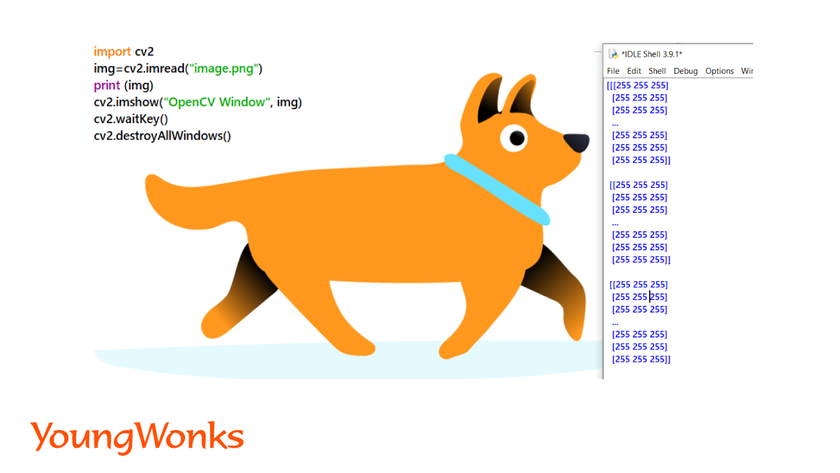
import cv2
img= cv2.imread(’path-of-the-image’)
print (img)
cv2.imshow(’’title-of-the-OpenCV-window",img)
cv2.waitKey()
cv2.destroyAllWindows()
Example:
In the code given above,
- We read the original image using the cv2.imread() function and pass the path of the image as an argument. Images can be various format such as png, jpg and jpeg.
- Printing the read image shows a 3D numpy array. This array shows the pixel information of the entire image. The 2D array inside the 3D array shows the pixel information of each row. Further, the 1D array shows the BGR values of each pixel. This 3D array which stores our images is our dataset to work with.
- cv2.imshow() is used to show the image on the OpenCV window. First argument is the title of the OpenCV window and second argument is the variable used to read the image.
- cv2.waitKey() is used to wait until key is pressed to close the window. A positive integer can be passed as a parameter which refers to the number of milliseconds screen will be visible before it gets closed. Using 0 as the parameter, will hold the screen until the user closes the screen.
- cv2.destroyAllWindows() is used to remove all the created windows.
2. Capture and Read Videos:
Part 1: Capture Videos:
Video is a bunch of frames which shows up very fast one after the other. Frame is an image which forms a single instance of a video. Frames show depending on the frame rate which is in frames per second(fps).
a. Capture video frame from an external video file or live video stream using the laptop’s webcam:
Syntax:
import cv2
captureobject=cv2.VideoCapture(’path-to-video’)
captureobject=cv2.VideoCapture(0)
In the code given above,
- We capture the video using the cv2.VideoCapture() function and pass an existing video file or port number of the webcam.
- Only positive integer values or an external video file name can be passed as an argument. This integer value represents the camera connected to the device. In laptops, the integrated webcam is the first camera and is accessed by the 0 value.
b. Capture video frame from external camera connected to desktop/laptop:
Syntax: captureobject=cv2.VideoCapture(n)
In the above given code, n in the argument refers to the port number of the external cameras. It’s an array with indices pointing to the different available cameras.
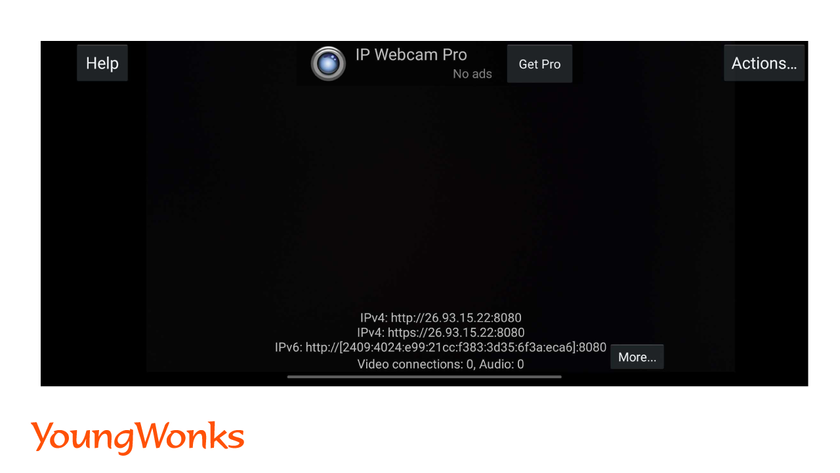
c. Capture video frame from phone video stream:
- Connect your phone to the same WiFi network as your laptop/desktop.
- Download the IPWebcam application and connect it to your computer.
- Choose the option to start the server.
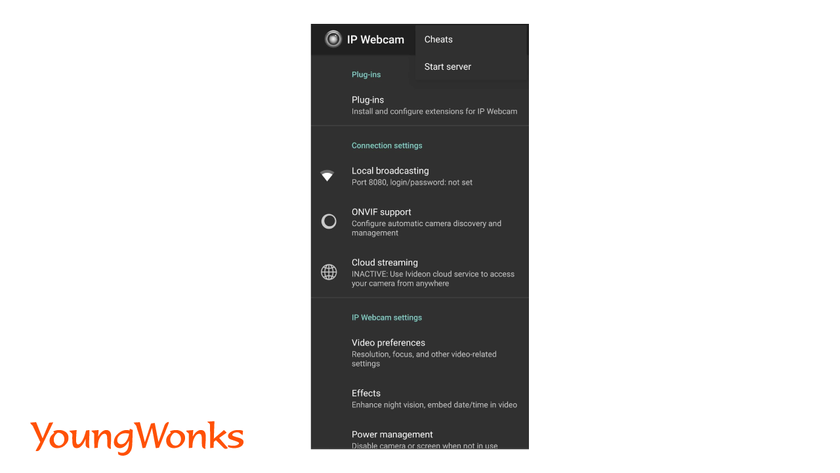
- You will receive an URL. Paste the URL in the VideoCapture() function.
Syntax: captureobject=cv2.VideoCapture(<URL>)
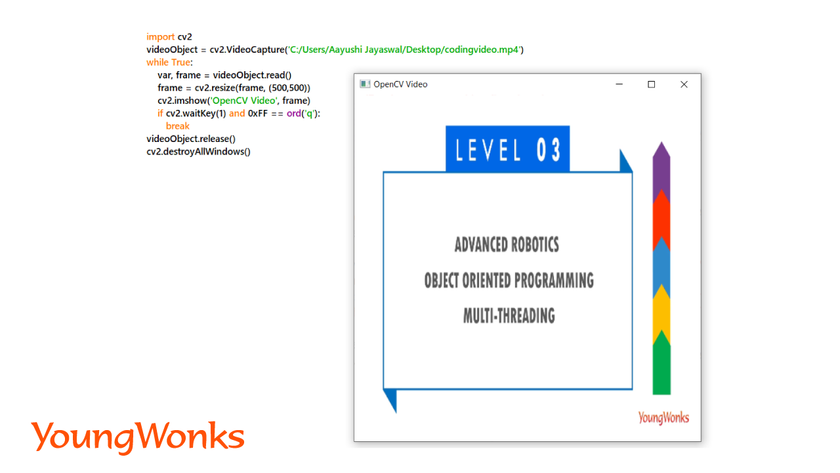
Part 2: Read Video frames captured:
Syntax: ret, frame = captureobject.read()
In the above given code,
- captureobject.read() function reads the video stream frame by frame and returns a tuple.
- First value in the tuple shows whether all the frames of the video were captured correctly or not. It has either True or False as the values.
- Second value is the captured frames showed in the form of a numpy array. The array contains pixel values/data. This pixel value is based on the number of BGR color channels present in the image.
- Color channels of an image are also known as color spaces. The default color space for OpenCV is RGB. However, it actually stores color in the BGR format.
Example:
Basic Transformations using OpenCV
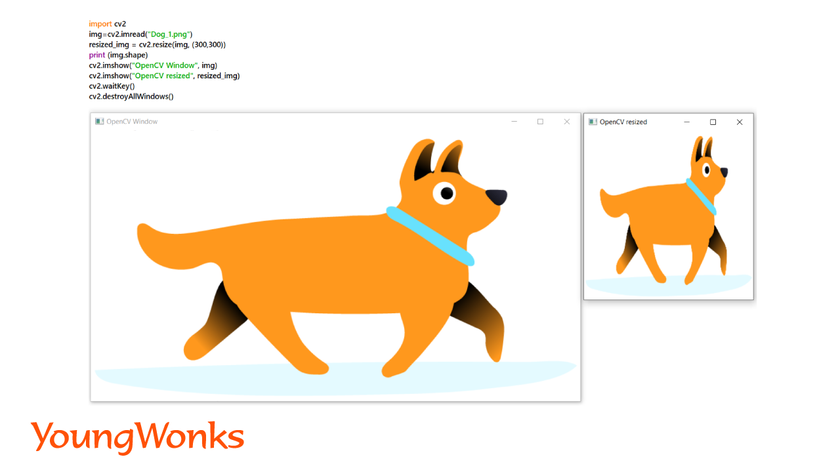
1. Resizing the images:
- To find the dimensions of an image: img.shape()
- The above code returns a tuple in this format: (height, width, length of the color value)
- Length of the color value is the color of the image.
- For example, BGR format requires 3 color values. If it was in the grayscale format, it would only require 1 value.
- Resizing of an image can be done by altering its width or height.
Syntax: resized_img = cv2.resize(img, (new_width, new_height))
Example:
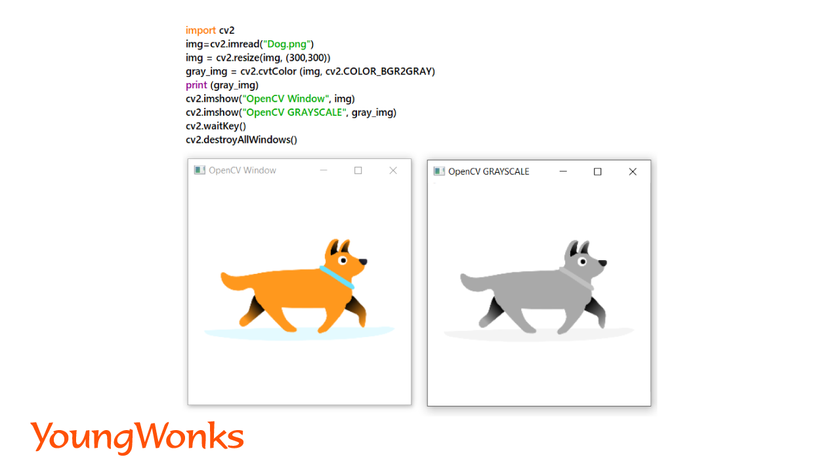
2. Read Images with different colors:
Here, we are going to learn how to change one color-space into another.
a. Read the image with BGR color:
Syntax: img= cv2.imread(’path-to-image’)
- This function reads the image as a colored image. Images can be in any format such as jpg, png or jpeg.
b. Read image as grayscale:
Syntax: img= cv2.imread(’path-to-image’)
gray_img = cv2.cvtColor (img, cv2.COLOR_BGR2GRAY)
- Grayscale images have only 1 value for each pixel as opposite to BGR which has 3 values for each pixel.
- The number represents the amount of gray in the pixel.
Example:
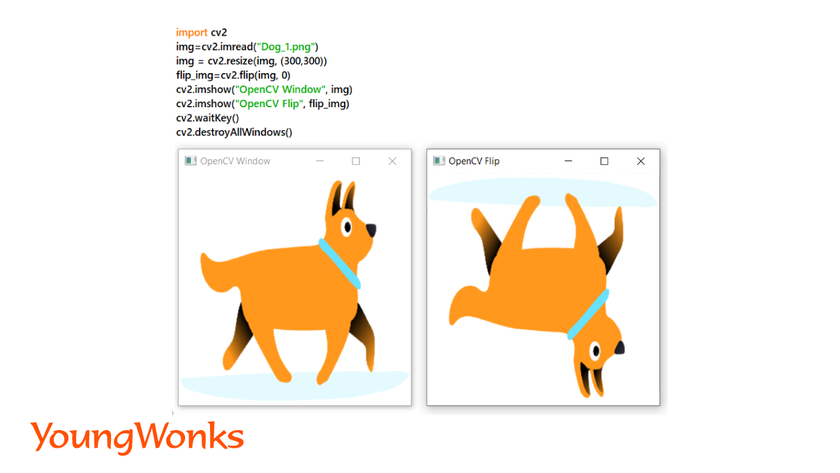
3. Flipping an image:
We can flip an image horizontally or vertically.
Syntax: flip_img= cv2.flip(img, 0)
- In the above code, second argument is either 0 or 1. 0 is for flipping the image vertically and 1 is to flip it horizontally.
Example:
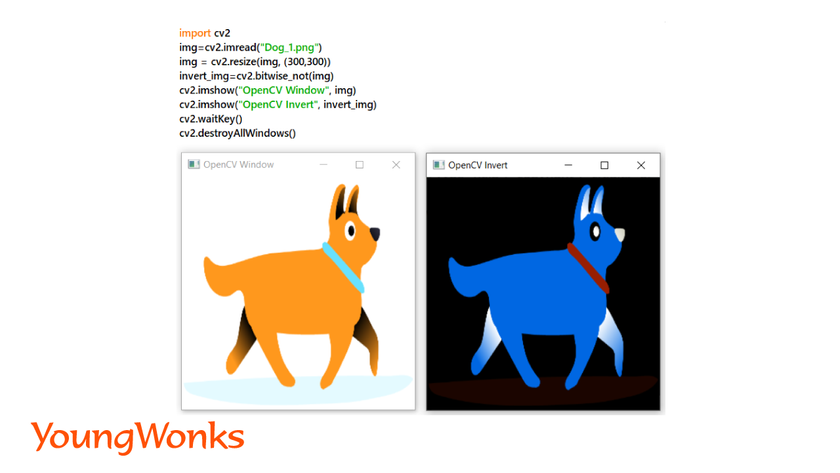
4. Inverting an image:
- This is reversing the color of the images.
- For example: if the color of an image is (255,0,0), after inverting the color of the image will be (0,255,255). Another example is when black images can be turned into white.
- It is obtained by subtracting the old RGB values from 255.
Syntax: invert_img=cv2.bitwise_not(img)
Example:
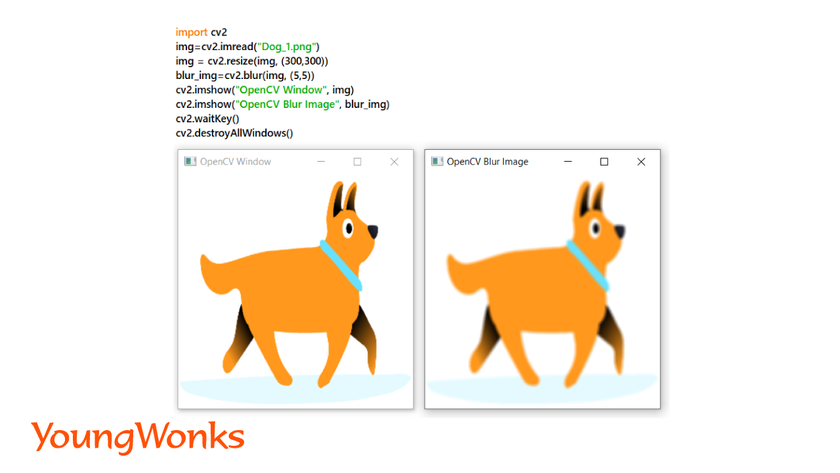
5. Blur an image:
- Blurring an image refers to reducing the details of an image such as noise and edges. This helps us focus on the most interesting objects of the image.
- This makes an image efficient for edge-detection and thresholding which we will discuss in the later part of the blog. In turn, we will be able focus on the larger objects in the image.
- There are various types of blurring in order to smoothen the image apart from normal/average blurring such as Gaussian blurring, Median filtering and Bilateral filtering.
Syntax: blur_img=cv2.blur(img, (kernel_width, kernel_height))
Example:
Advanced Transformations using OpenCV
Apart from the basic transformation, OpenCV contains advanced transformation techniques which is useful before we perform edge-detection and thresholding. These are the morphological operations. These are applied on the structural elements of an image which makes changes to the shape of the objects.
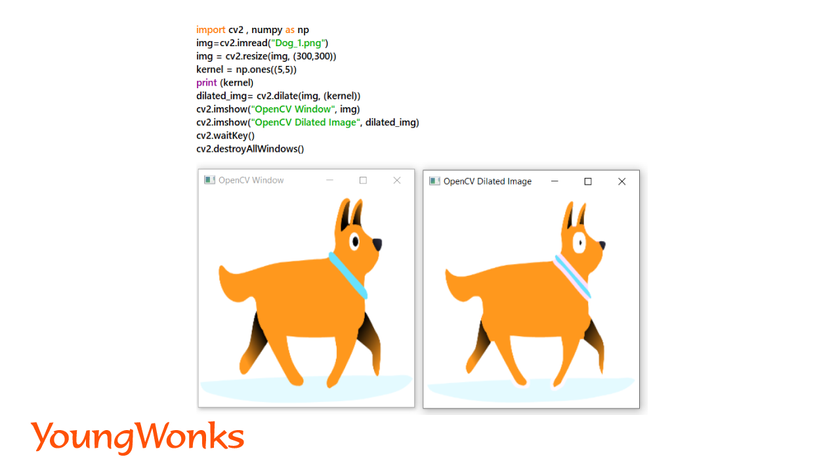
1. Dilation of an image:
- The action of expanding or widening the image is known as dilation.
- In image processing dilation refers to adding pixels to the boundaries of objects in an image.
- Each boundary pixel which is taken from an input image gives the maximum value of all the pixels in its neighbourhood. This maximum value is seen as an output pixel into the resultant image.
- In this process, the objects are more visible, small holes in objects get filled up, lines appear thicker, and filled shapes appear larger.
- The original image is first converted into a binary image i.e. black and white image. Then, morphological operations are performed on it.
Syntax: dilated_img= cv2.dilate(img, (kernel_width, kernel_height))
Example:
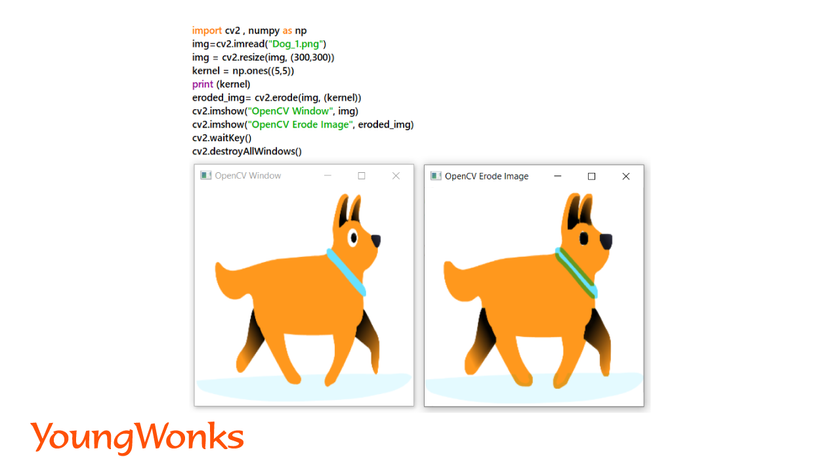
2. Erosion of an image:
- This action leads to shrinking of object boundaries. It is achieved by removing pixels from an image.
- Each boundary pixel which is taken from an input image gives the minimum value of all the pixels in its neighbourhood. This minimum value is seen as an output pixel into the resultant image.
- In this process, floating pixels and thin lines are removed so that only substantive objects remain, remaining lines appear thinner and shapes appear smaller.
Syntax: eroded_img= cv2.erode(img, (kernel_width, kernel_height))
Example:
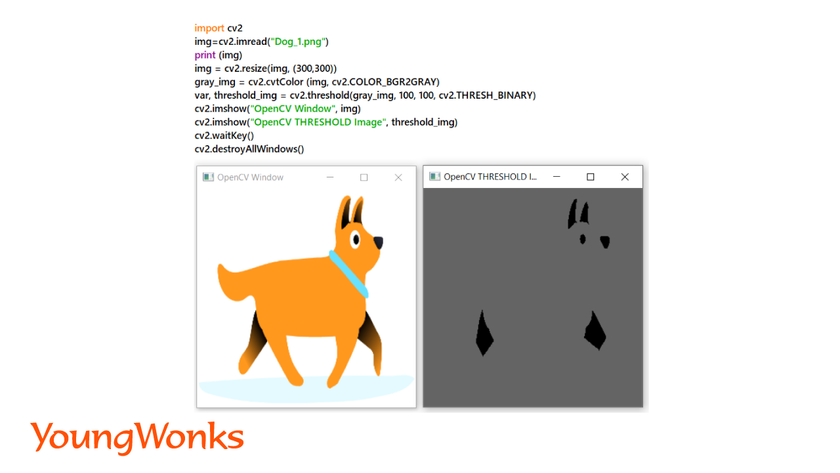
3. Thresholding:
- This is an image segmentation technique to convert color or grayscale images into binary images.
- Binary images means black and white images, they only have two pixel values, which is 0 and 255.
- It is a technique to separate the objects from their background.
- Steps to perform thresholding:
- Read the original image as grayscale image.
- Convert this into a binary image with a given threshold value.
Syntax:
threshold_image = cv2.threshold(gray_img, threshold_value, maximum_pixel_value, cv2.THRESH_BINARY)
- Example: In the example given above, two values for thresholding are provided and all pixels with values lesser than the lower threshold value have converted to black and the other pixels are white. This is one of the most used thresholding techniques.
- Real life example is X-ray images of organs.
Example:
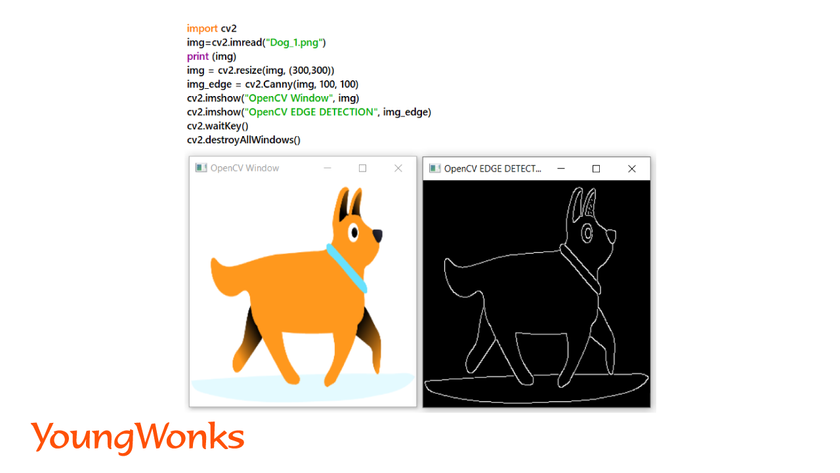
4. Edge Detection:
- It is a technique used to detect objects and regions present in images. This is also used to detect edges of images in real-time.
- Canny Edge-Detection Technique using OpenCV is a popular technique. In this, we give two threshold values which we want to separate from an image.
Syntax: img_edge = cv2.Canny(img, threshold_value1, threshold_value2)
- The smallest value between threshold value1 and threshold value2 is used for edge linking. The largest value is used to find initial segments of strong edges.
Example:
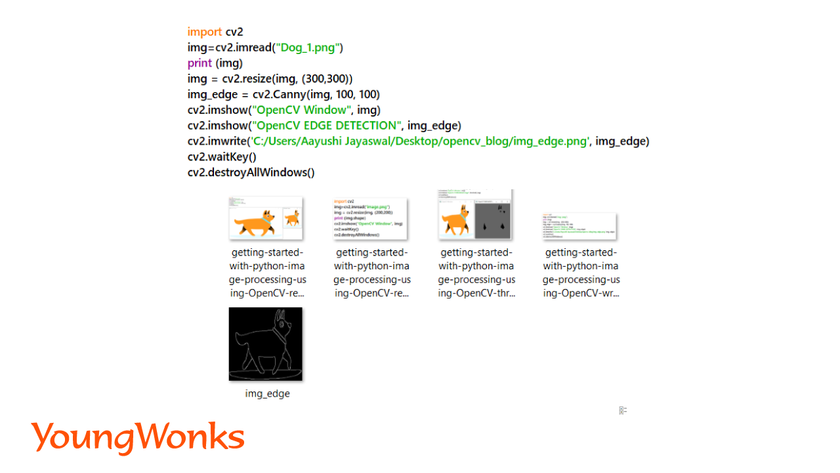
Saving Images on various devices
Writing images on to any device:
Syntax: img_written - cv2.imwrite(path-to-save-the-image, img)
- The above function helps in saving the images. First argument is the path to the directory where the image is saved. Second argument is for the name of the image.
Example:

Saving the frames from videos:
Syntax:
import cv2
videoObject = cv2.VideoCapture(0)
while True:
var, frame = videoObject.read()
cv2.imshow(’Video’, frame)
cv2.imwrite("path-to-the-image", frame)
if cv2.waitkey(1) == and 0xFF == ord('q'):
break
videoObject.release()
cv2.destroyAllWindows()
Example:

In the example given above, we are writing 10 frames of the video on our system.
You can also refer to the cheatsheet available on https://www.youngwonks.com/resources/opencv-cheatsheet
Additional Information
Image Processing is one of the very vast fields of data science. You can try out visualizing the color scales by plotting the numpy array point on a graph using matplotlib. Tensorflow is an open-source library which has many algorithms and models. These models allow us to perform deep neural networks for image detection or classification. After learning the basics of OpenCV, Tensorflow can be used to create machine learning models.
Expand Your Child's Coding Journey
After mastering the basics of Python image processing with OpenCV, the possibilities for further programming development are vast. At Coding Classes for Kids, we provide a spectrum of courses tailored to nurture young minds in the field of technology. From Python Coding Classes for Kids that deepen their programming knowledge to our specialized Raspberry Pi, Arduino, and Game Development Coding Classes, we equip students with the skills needed to innovate and excel in the digital age.
*Contributors: Written by Aayushi Jayaswal; Lead image by Shivendra Singh